How to create animated gif from multiple images with ImageMagick
Read this tutorial if you have several images and you would like to make them into an animated gif.
This quick tutorial is going to work best for you if you are on Mac OS and you know how to run commands in the terminal. Every Unix system should work fine; you’ll just need to install the dependencies differently.
Note: This article is much more technical than what I usually write, let me know if you like👍 or dislike👎 it.
Install prerequisites and get your images ready
This section uses Mac OS homebrew package manager, but you can find the dependencies on any Unix system.
- Install ImageMagick with
brew install imagemagick. - Install Gimp with
brew cask install gimp.- Skip installing Gimp if you don’t need to custom crop your images.
Now put your images in one folder. Alphabetical order of the file names will decide the order in which the pictures show in the animation.
└── folder-for-images
    ├── 2020-07-07.jpg
    ├── 2020-07-08.jpg
    ├── 2020-07-09.jpg
    └── 2020-07-10.jpg
If you need more complex renaming and you are not a shell scripting guru, have a look at massren. It lets you use your favourite editor to rename multiple files.
Let’s move to the gif making.
Step 0: Custom crop your images (optional)
This step is optional and is only necessary if your images contain the subject of animation in different spots, For example, if you were taking screenshots, and each image has a different aspect ratio.
This step takes the largest portion of the time, so try to avoid it at the time you are getting the pictures.
Goal: Make sure that all the images contain the same object at the same spot.
| first | second | |
|---|---|---|
| before | 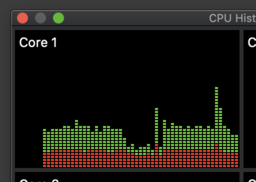 |
 |
| after |  |
 |
- Drag all the images into Gimp window
- Select the crop tool

- Zoom in

- Crop each image and export it. (
File->Export as)
Step 1: Use ImageMagick to create the gif
Now we run one command that will do all the work. The command is not changing the current images so you don’t have to worry about losing your data.
cd folder-for-images
convert \
  2020*.jpg \
  -gravity center -crop 1:1 +repage \
  -resize 800x800 \
  -set delay 50 \
  animation.gif
Explaining the command
The convert command is part of the ImageMagick installation.
2020*.jpg- Gather image files - we’ll process all jpg files in the folder starting with2020. You can change the glob pattern or the extension.-gravity center -crop 1:1 +repage- Corp images to aspect ratio (optional) - we’ll crop the images to have the same width and height (1:1) and we’ll crop around thecenterof the image. Then we+repagethe canvas to reflect the new aspect ratio.-resize 800x800- Resize images (optional) - If you publish your gif on the internet, it’s a good idea to make it smaller so people can quickly fetch it.800x800is in pixels, and it matches the previously set1:1aspect ratio.convertwill always preserve the original aspect ratio, and so the specified dimensions present an upper limit.-set delay 50- Set animation delay - wait 50 ms before showing the next image in the gifanimation.gif- Name of the output file. Has to end with.gif
Examples
Gif from photos
Gif from screenshots
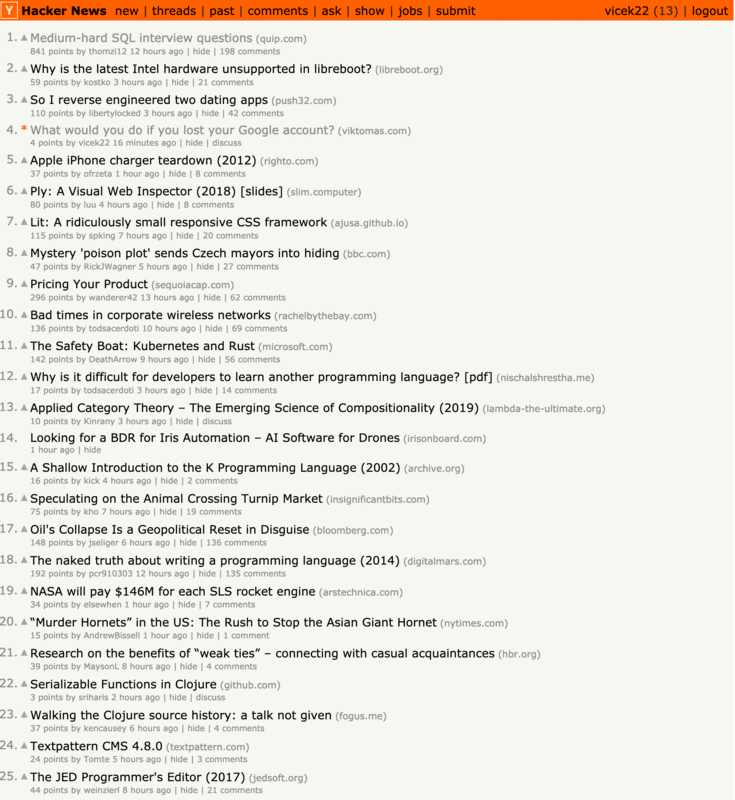
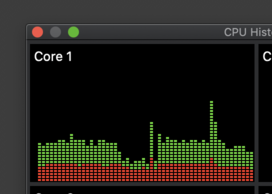
This one is from my previous article: How my article became one-hit-wonder on hacker news.